How to Remove Window Tint Glue: 2026 DIY Guide
Struggling with sticky residue? Learn how to remove window tint glue quickly and safely without damaging your glass or defroster lines in our 2026 guide.
Whether you are removing old, bubbling purple tint or simply upgrading to a darker shade, the hardest part of the job isn't pulling the film off—it’s dealing with the sticky, stubborn adhesive left behind. If not handled correctly, window tint glue can smear, ruin your interior, or even damage your rear defroster lines.
In this guide, we’ll walk you through the professional methods for removing window tint glue using household items and specialized tools.
Why is Window Tint Glue So Difficult to Remove?
Window tint is applied with a pressure-sensitive adhesive (PSA). Over years of exposure to UV rays and heat, this adhesive undergoes a chemical change, making it bond aggressively to the glass while becoming brittle. When you peel the polyester film away, the glue often stays behind in a thick, tacky layer.
Preparation: What You’ll Need
Before you start, gather these essential supplies:
* A heat source: A professional heat gun or a powerful hair dryer.
* Solvent: 70% or 90% Isopropyl alcohol, or a dedicated adhesive remover.
* Scraper tools: Fresh stainless steel razor blades (for side windows) and plastic scrapers (for rear windows with defroster lines).
* Cleaning supplies: Microfiber towels, soapy water (dish soap works best), and 0000-grade steel wool.
* Protection: Plastic trash bags or drop cloths to protect your door panels.
3 Proven Methods to Remove Tint Glue
1. The Steam & Solvent Method (Safest for Rear Windows)
This is the preferred method for back windows because it protects the delicate copper defroster grids.
- Heat the glass: Use a steamer or heat gun on the outside of the glass to soften the bond.
- Spray the residue: Apply a generous amount of isopropyl alcohol or a soapy water solution to the glue.
- The Scrub: Use 0000-grade steel wool. This specific grade is fine enough to scrub away glue without scratching the glass or cutting the defroster lines.
- Wipe: Use a clean microfiber towel to lift the dissolved glue before it dries.
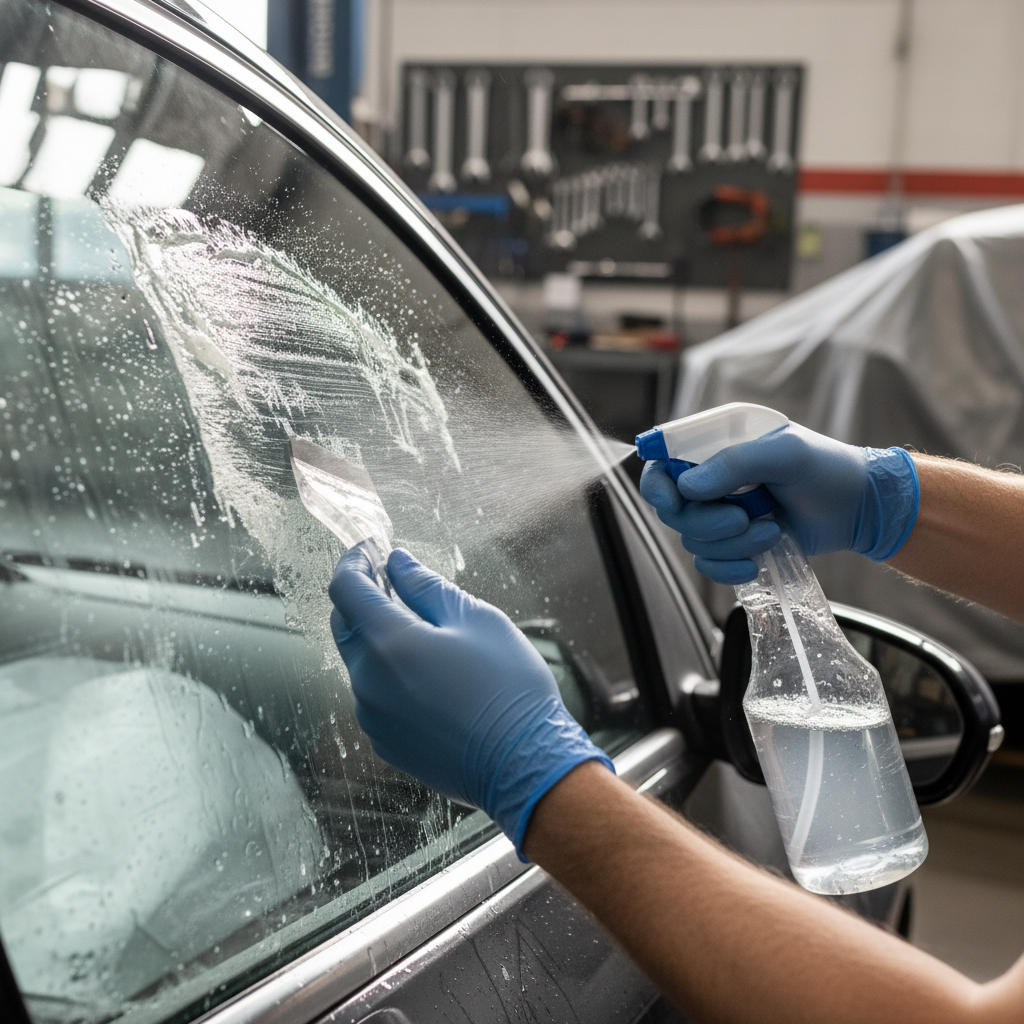
2. The Razor Blade Method (Fastest for Side Windows)
Warning: Never use a metal razor blade on rear windows with defroster lines or windows with "antenna" wires embedded in the glass.
- Lubricate: Spray the window heavily with soapy water. Never "dry scrape" glue, as it causes scratching.
- Angle the blade: Hold a new stainless steel razor at a 45-degree angle.
- Scrape: Work in small sections, pushing the glue into a pile.
- Detailing: Use a specialized adhesive remover for any tiny specks left in the corners.
3. The "Trash Bag" Solar Method
If you have a sunny day, this is the "lazy" but effective "pro" secret.
- Spray: Saturate the glue residue with an ammonia-based cleaner or soapy water.
- Seal: Press a black plastic trash bag against the wet glass inside the car.
- Sun Soak: Park the car in direct sunlight for 30–60 minutes. The heat trapped by the black plastic creates a "steamer" effect, liquefying the glue.
- Peel and Wipe: The glue should wipe off easily with a paper towel.
Summary of Removal Tools by Window Type
| Window Type | Recommended Tool | Safety Risk |
|---|---|---|
| Side Windows | Stainless Steel Razor | Low (Safe on glass) |
| Rear Window | Plastic Scraper / 0000 Steel Wool | High (Defroster damage) |
| Windshield | Plastic Scraper | Medium (Scratches) |
| Quarter Glass | Isopropyl Alcohol & Microfiber | Low |
Tips to Prevent a Mess
* Protect your Door Panels: Window tint glue is incredibly messy. If it drips onto leather or plastic trim and dries, it can be permanent. Use painters tape and plastic sheeting to cover the interior door cards.
* Keep it Wet: The moment the glue dries, it becomes difficult to move. Keep your solvent or soapy water spray handy.
* Use Fresh Blades: A dull blade is more likely to scratch the glass than a sharp one. Change your razor every two windows.
Next Steps
Once your glass is perfectly clear and smooth, you're ready for a fresh install. If you've realized that DIY tint removal is more work than you bargained for, we can help.
Check out our /calculator to see what a professional tint or wrap job might cost, or use our /search tool to find a top-rated shop in your area that handles removal and re-tints.
For more information on different finishes and films, visit our /wrap-types page.
Frequently Asked Questions
Can I use a razor blade on my rear window to remove glue?
Yes, but you must be extremely careful. Never use a metal razor blade on the rear window as it will cut the copper heating elements. Instead, use a steamer, a plastic scraper, or 0000-grade steel wool combined with a solvent like isopropyl alcohol to gently scrub the glue away.
What is the best household cleaner to dissolve tint glue?
The best household items for removing tint adhesive are 70% isopropyl alcohol, soapy water (using grease-cutting dish soap), or a mixture of water and white vinegar. Ammonia-based glass cleaners are also effective but can be harsh on your car's interior trim, so use them sparingly.
Will new tint hide the old glue residue?
If the glue is not removed entirely, new window tint will not adhere properly. Any remaining residue will cause bubbles, 'fingers', or a grainy appearance under the new film. The glass must be 'squeaky clean' and smooth to the touch before re-tinting.